20% OFF ON all TUB TO shower REMODELS!!! offer ends on 07/01/2026!!
What Happens During a Shower Remodel? A Step-by-Step Guide for Phoenix Homeowners
Wondering what happens during a shower remodel? Learn the complete shower remodeling process, timeline, and what to expect from demolition to the final walkthrough.
BATHROOM EDUCATION
AffordaLux Bath team
6/27/20265 min read

What Happens During a Shower Remodel?
If you're considering replacing your old bathtub or shower, you're probably wondering what the remodeling process actually looks like. One of the most common questions we hear from homeowners is:
"What happens once the project starts?"
The good news is that a professionally planned shower remodel is much more organized than many people expect. At AffordaLux Bath, we strive to make the process as smooth and stress-free as possible while delivering a beautiful shower that's built to last.
Here's what you can expect during a typical shower remodel.
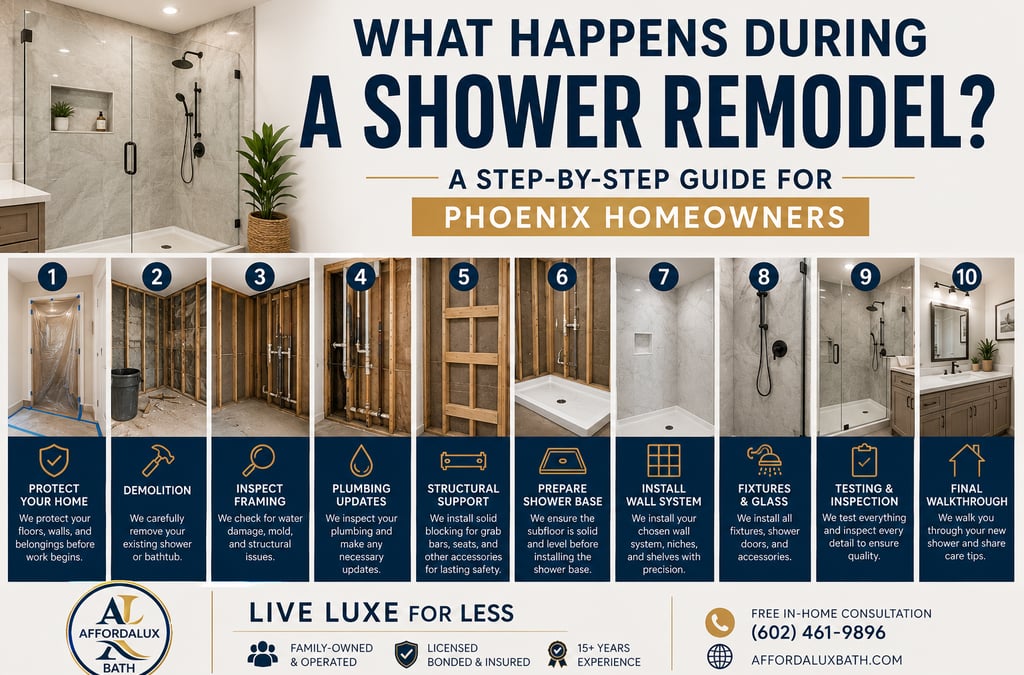
Step 1: Protecting Your Home
Before any demolition begins, we take time to protect your home.
This includes:
Covering floors
Protecting nearby walls
Using drop cloths
Keeping the work area contained
Our goal is to minimize dust and disruption while treating your home with the same care we'd expect in our own.
Step 2: Removing the Existing Shower or Bathtub
Next, we carefully remove your existing shower, bathtub, wall panels, or tile.
Once everything has been removed, we're able to inspect what's hidden behind the walls.
This is an important step because many older bathrooms can hide issues that aren't visible from the outside.
Step 3: Inspecting the Framing
With the walls open, we inspect the framing for any signs of:
Water damage
Rot
Mold
Structural concerns
If repairs are needed, they're completed before moving forward.
Building a beautiful shower on damaged framing simply isn't the right way to do the job.
Step 4: Plumbing Inspection and Updates
This is also the perfect opportunity to inspect your plumbing.
Depending on the home's age, we may recommend replacing older plumbing components (for example, the P-trap), we always install a new pressure-balanced shower valve.
Making these updates now is much easier than after the walls are closed.
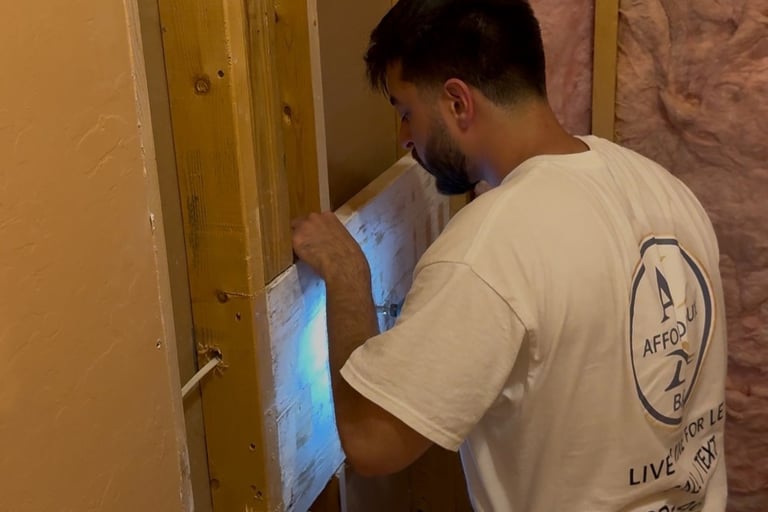
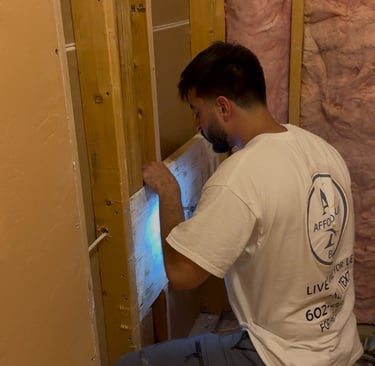
Step 5: Installing Structural Support for Accessories
One step many homeowners never see—but one of the most important—is adding structural backing inside the walls.
Whenever we're installing accessories like:
Fold-down shower seats
Grab bars
Heavy glass doors
we install solid wood blocking securely fastened between the wall studs.
This hidden reinforcement helps distribute weight properly and provides a much stronger attachment than simply fastening into drywall or thin wall panels.
It's one of those details that may never be visible, but it makes a significant difference in long-term safety and durability.
Step 6: Preparing the Shower Base
The shower base is one of the most important parts of the entire installation.
Before it's installed, we make sure the subfloor is solid and level.
A properly supported shower base helps prevent movement, improves drainage, and contributes to the long-term performance of your new shower.
You can learn more about the different shower bases by clicking the link below.
Step 7: Installing the Wall System
Now your new shower begins to take shape.
Depending on the design you've selected, we install:
Stone composite panels
Acrylic wall systems
Custom tile
We also install recessed niches, corner shelves, and any other accessories you've chosen.
Careful measuring and precise installation help ensure a clean, finished appearance.
If you are curious or interested in learning which material is best for your shower, click the link below to learn more about the differences between the commonly used acrylic and stone composite shower panels in this market.
Step 8: Installing Fixtures and Glass
Once the wall system is complete, we install:
Shower valve trim
Shower head
Handheld sprayer
Grab bars
Shower doors or glass enclosure
window trim
This is when the bathroom really starts to come together.
Step 9: Sealing, Testing, and Final Inspection
Before we consider the project complete, we perform a thorough inspection.
We check:
Water flow
Drainage
Door operation
Caulking
Fixture operation
Overall finish quality
Any final adjustments are made before the project is complete.
Step 10: Final Walkthrough
Finally, we walk through the completed shower with you.
We'll explain:
How to care for your new shower
Recommended cleaning products
Warranty information
Maintenance tips
Our goal isn't just to install a beautiful shower—it's to make sure you feel confident using and caring for it for years to come.
How Long Does the Process Take?
Every project is unique, but many shower remodels using premium wall panel systems can often be completed in as little as one to two days after materials are ready.
More complex custom tile projects typically take longer due to waterproofing, curing times, and grout installation.
If you'd like a more detailed breakdown, be sure to read our guide on How Long Does a Bathroom Remodel Take in Phoenix?
Why the Process Matters
A shower remodel isn't just about replacing old materials with new ones.
The work happening behind the walls—checking framing, updating plumbing when needed, reinforcing walls for accessories, and ensuring everything is installed correctly—is what helps determine how your shower performs for years to come.
Choosing a contractor who pays attention to these details can make a significant difference in the safety, durability, and longevity of your investment.
Ready to Upgrade Your Shower?
Whether you're planning a tub-to-shower conversion, a walk-in shower, or a complete bathroom update, understanding the remodeling process can help you feel confident before work begins.
If you're ready to explore your options, AffordaLux Bath proudly provides free in-home consultations throughout the Phoenix area. We'll answer your questions, discuss design ideas, and help you choose a shower solution that fits your home and your budget.
Frequently asked questions
What happens during a shower remodel?
A typical shower remodel begins by protecting your home and removing the existing shower or bathtub. Once the area is exposed, the contractor inspects the framing and plumbing, makes any necessary repairs, installs the new shower base and wall system, adds fixtures and accessories, and completes a final inspection to ensure everything is functioning properly.
How long does a shower remodel take?
Many shower remodels using acrylic or stone composite wall systems can be completed in as little as one to two days once materials are available. Custom tile showers generally require more time because of waterproofing, tile installation, grout curing, and finishing work.
Will my plumbing be replaced during a shower remodel?
We always replace the valves, new water lines, new shower drain and if required new p-trap. It's often recommended to replace aging shower valves, damaged piping, or outdated plumbing components while the walls are open. Making these upgrades during the remodel is usually more cost-effective than waiting until after the project is complete.
Do contractors inspect the walls before installing a new shower?
Yes. A professional shower remodel should include an inspection of the wall framing after demolition. This allows the contractor to identify water damage, mold, rot, or structural issues before installing new materials, helping ensure a durable and long-lasting shower.
Can grab bars and shower seats be installed later?
They can, but it's often best to install structural wood blocking inside the walls during the remodel. This provides a stronger mounting surface for grab bars, fold-down seats, and other safety accessories, especially for homeowners planning to age in place.
Affordable bathroom remodeling built on trust and care. Proudly serving Arizona homeowners.
Phone
affordaluxbath@gmail.com
(602) 461-9896
© 2025 AffordaLux Bath. All rights reserved.
Request Your Free In-Home Consultation
No pressure. No hidden costs.
[ Get Free Quote ]
✔ Family-Owned & Operated
✔ Licensed, Bonded & Insured
✔ 15+ Years Experience
License ROC362775